
![]()
OPC UA Agent Tutorial
This is a step-by-step tutorial that will introduce in detail how to enable OPC UA to FIWARE connecting an OPC UA server to Orion Context Broker using the agent. The OPC UA data will be automatically published in a FIWARE Orion Context Broker using NGSI data model.
What is OPC UA?
OPC UA is a well-known client-server protocol used in the Industry.
In real environments, an OPC UA server is usually responsible for fetching sensor data from factory-level machinery making them available to an OPC UA client (the Agent in our case).
Before a client can retrieve their values, sensors are mapped to the OPC UA Server Address Space as variables (or attributes). Moreover, it is also possible to control the machinery invoking methods exposed by the server.
Sensor values access is provided through a subscription mechanism. For each sensor value the OPC UA client wants to have access to, it creates a subscription specifying some parameters. Using these parameters the client asks the server to send data according to some particular modalities. At that point the server determines if the requests can be fulfilled, otherwise it will continue sending data in a best effort mode.
Here a short description of the most relevant parameters:
- samplingInterval defines, for each MonitoredItem, the interval used by the server to evaluate changes in the value of the variable. The actual value chosen by the server depends on the underlying hardware capabilities
- publishingInterval defines the interval that has to elapse to notify possible changes to the client. Whenever the server discovers a change in the value of a variable, this new value is stored into the queue. When publishingInterval expires the entire queue is sent to the client. In this way the client can receive even very fast changes that otherwise would not have been detected
- queueSize defines, for each Monitoreditem, the size of the queue within which to store changes in the variable. When samples are sent to the client the queue is emptied
In our case the OPC UA Agent acts as bridge between the OPC UA server and the Orion Context Broker behaving as an OPC UA client.
Actors
The actors involved in the scenario are:
- OPC UA Server, representing the data source
- OPC UA Agent, the connector to join industrial environment to FIWARE
- Orion Context Broker, the broker as entry point of FIWARE platform
OPC UA Server
For tutorial purposes, you will use a simple OPC UA server (source code here).
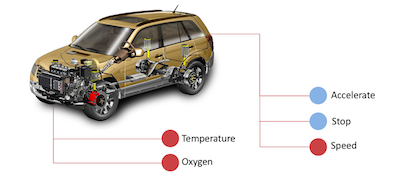
It represents a car with the following structure:
-
Car (obj)
-
Speed (attr)
-
Accelerate (meth)
-
-
Stop (meth)
-
Engine (obj)
- Temperature (attr)
- Oxygen (attr)
-
-
Sensors
-
Any number of user-defined Boolean sensor simulating a square-wave
-
For each sensor it is possible to define the semi-period
-
OPC UA Agent
IoT Agent can be configured as described in the user guide. In order to start playing with the above mentioned OPC UA server, configuration files have been already edited and available in conf folder.
Orion Context Broker
Orion Context Broker can be external, however to have a black box for testing, it will be included in docker compose in order to have a self-supporting environment. Be aware to choose the correct version, please use orion if it's needed to test the Agent with NGSI v2 otherwise use orion-ld in case of NGSI-ld test.
Step-by-step Tutorial
In this paragraph we are going to describe how to quickly deploy a working testbed consisting of all the actors: Car, Agent, Orion Context Broker and the two MongoDB instances.
Requirements
- Docker (Version 19.03.1+)
- Docker-compose (Version 1.24.1+)
Install docker and docker-compose by following the instructions available on the official web site:
Once docker has been correctly installed you can continue with the other steps
Step 1 - Clone the OPCUA Agent Repository
Open a terminal and move into a folder in which to create the new folder containing the IotAgent testbed
Then run:
git clone "https://github.com/Engineering-Research-and-Development/iotagent-opcua"
Step 2 - Run the testbed
To launch the whole testbed:
cd iotagent-opcua/docker
docker-compose up -d
After that you can run:
docker ps
to check if all the required components are running
Running the docker environment (using configuration files as is) creates the following situation:
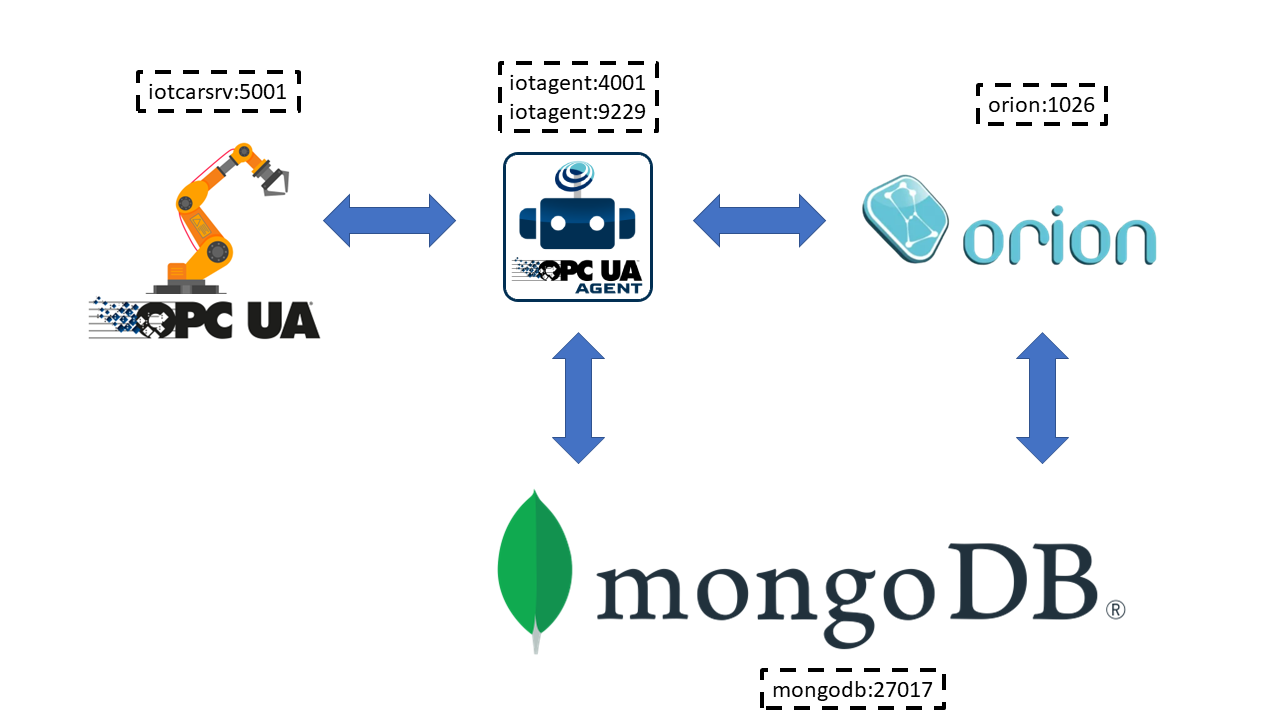
Appendix A quickly describes what you can do with the docker-compose.yml
Step 3 - Start using the testbed
For the Agent to work an initialization phase is required. During this phase the Agent becomes aware of what variables and methods are available on OPC UA server-side. These information can be provided to the agent by means of a configuration file (config.js) or through the REST API
Three different initialization modalities are available:
- Use a preloaded config.js
- Invoke a mapping tool responsible of automatically building the config.js (NOTE: _Before using the MappingTool, erase the three objects: types, contexts, contextSubscriptions within the existing config.js_)
- Use the REST API
Since in the following parts of this tutorial we are going to use the REST API you have not to worry about the initialization.
Step 4 - Provision a new Device
By Device we mean the set of variables (attributes) and methods available on OPC UA Server-side.
To provision the Device corresponding to what the CarServer offers, use the following REST call:
curl http://localhost:4041/iot/devices \
     -H "fiware-service: opcua_car" \
     -H "fiware-servicepath: /demo" \
     -H "Content-Type: application/json" \
     -d '
     {
    "devices": [
        {
            "device_id": "",
            "entity_name": "age01_Car",
            "entity_type": "Device",
            "apikey": "iot",
            "service": "opcua_car",
            "subservice": "/demo",
            "attributes": [
                {
                    "name": "EngineBrake",
                    "type": "Number"
                },
                {
                    "name": "Acceleration",
                    "type": "Number"
                },
                {
                    "name": "EngineStopped",
                    "type": "Boolean"
                },
                {
                    "name": "Engine_Temperature",
                    "type": "Number"
                },
                {
                    "name": "Engine_Oxigen",
                    "type": "Number"
                }
            ],
            "lazy": [
                {
                    "name": "Speed",
                    "type": "Number"
                }
            ],
            "commands": [
                {
                    "name": "Error",
                    "type": "command"
                },
                {
                    "name": "Stop",
                    "type": "command"
                },
                {
                    "name": "Accelerate",
                    "type": "command"
                }
            ],
            "endpoint": "opc.tcp://iotcarsrv:5001/UA/CarServer"
        }
    ]
}'
Step 5 - Get devices
Check if the operation went well, by sending the following REST call:
curl http://localhost:4041/iot/devices \
     -H "fiware-service: opcua_car" \
     -H "fiware-servicepath: /demo"
You should obtain a JSON indicating that there is one device
Interlude
You can interact with the CarServer through the Agent in three different ways:
-
Active attributes For attributes mapped as active the Agent receives in real-time the updated values
-
Lazy attributes For this kind of attribute the OPC UA Server is not willing to send the value to the Agent, therefore this can be obtained only upon request. The agent registers itself as lazy attribute provider being responsible for retrieving it
-
Commands
Through the requests described below it is possible to execute methods on the OPC UA server
Step 6 - Monitor Agent behaviour
Any activity regarding the Agent can be monitored looking at the logs. To view docker testbed logs run:
cd iotagent-opcua/docker
docker-compose logs -f
Looking at these logs is useful to spot possible errors
Step 7 - Accelerate
In order to send the Accelerate command (method in OPC UA jargon), the request has to be sent to Orion that forwards the request to the OPC UA Agent:
For NGSIv2:
curl -X PUT \
  'http://localhost:1026/v2/entities/age01_Car/attrs/Accelerate?type=Device' \
  -H 'content-type: application/json' \
  -H 'fiware-service: opcua_car' \
  -H 'fiware-servicepath: /demo' \
  -d '{
  "value": [2],
  "type": "command"
}'
For NGSI-ld:
curl --location --request PATCH 'http://localhost:1026/ngsi-ld/v1/entities/urn:ngsi-ld:Device:age01_Car/attrs/Accelerate' \
--header 'fiware-service: opcua_car' \
--header 'fiware-servicepath: /demo' \
--header 'Content-Type: application/json' \
--data-raw '{
    "value": "1"
}'
To proof that the method Accelerate is arrived to the device, it is sufficient to evaluate the speed attribute (must be greater than zero):
curl -X GET \
  http://localhost:1026/v2/entities/age01_Car/attrs/Speed \
  -H 'fiware-service: opcua_car' \
  -H 'fiware-servicepath: /demo'
The OPC UA Agent monitors all attributes defined as active into config.js file, after creation of NGSI entity as
proof:
curl -X GET \
  http://localhost:1026/v2/entities \
  -H 'fiware-service: opcua_car' \
  -H 'fiware-servicepath: /demo'
What's next?
Finishing this tutorial you have an overview on how the Agent works and interacts with the other components (OPC UA Server and Orion Context Broker).
In order to fully understand how the OPC UA IotAgent can be used in a real environment (i.e. connected to an external OPC UA Server) you probably need some further information on the initialization/configuration stage, i.e. where the link between the Agent and the machinery is established.
These information are available in the User & Programmers Manual section
How to build the Docker Image
If you have changes to the Agent codebase that you want to integrate, or you want to modify the current Docker deployment package:
Here you find the instructions on how to build a Docker Image for the Agent
Appendices
Appendix A - Customize the environment
Docker Compose can be downloaded here docker-compose.yml:
Modifying this file you can:
- Change exposed ports
- Extend the stack with other services (e.g. Cygnus)
version: "3.1"

volumes:
    mongodb: ~

services:
    iot-agent:
        image: iotagent4fiware/iotagent-opcua:latest
        hostname: iotagent-opcua
        depends_on:
            - mongodb
            - iotcarsrv
            - orion
        networks:
            - hostnet
        ports:
            - "4041:4041"
            - "9229:9229"
        environment:
            - "IOTA_CB_HOST=orion"
            - "IOTA_CB_PORT=1026"
            - "IOTA_NORTH_PORT=4041"
            - "IOTA_REGISTRY_TYPE=mongodb"
            - "IOTA_MONGO_HOST=mongodb"
            - "IOTA_MONGO_PORT=27017"
            - "IOTA_MONGO_DB=iotagent_opcua"
            - "IOTA_PROVIDER_URL=http://iotagent-opcua:4041"
            - "IOTA_OPCUA_ENDPOINT=opc.tcp://iotcarsrv:5001/UA/CarServer"
            - "IOTA_OPCUA_SECURITY_MODE=None"
            - "IOTA_OPCUA_SECURITY_POLICY=None"
            #- "IOTA_OPCUA_SECURITY_USERNAME=null"
            #- "IOTA_OPCUA_SECURITY_PASSWORD=null"
            - "IOTA_OPCUA_UNIQUE_SUBSCRIPTION=false"
            - "IOTA_OPCUA_SUBSCRIPTION_NOTIFICATIONS_PER_PUBLISH=1000"
            - "IOTA_OPCUA_SUBSCRIPTION_PUBLISHING_ENABLED=true"
            - "IOTA_OPCUA_SUBSCRIPTION_REQ_LIFETIME_COUNT=100"
            - "IOTA_OPCUA_SUBSCRIPTION_REQ_MAX_KEEP_ALIVE_COUNT=10"
            - "IOTA_OPCUA_SUBSCRIPTION_REQ_PUBLISHING_INTERVAL=1000"
            - "IOTA_OPCUA_SUBSCRIPTION_PRIORITY=128"
            - "IOTA_EXTENDED_FORBIDDEN_CHARACTERS=[]"
            - "IOTA_OPCUA_MT_POLLING=false"
            - "IOTA_OPCUA_MT_AGENT_ID=age01_"
            - "IOTA_OPCUA_MT_ENTITY_ID=age01_Car"
            - "IOTA_OPCUA_MT_ENTITY_TYPE=Device"
            - "IOTA_OPCUA_MT_NAMESPACE_IGNORE=0,7"
            - "IOTA_OPCUA_MT_STORE_OUTPUT=0,7"
            - "IOTA_OPCUA_MT_STORE_OUTPUT=true"
        volumes:
            - ../conf:/opt/iotagent-opcua/conf

    mongodb:
        image: mongo:4.2
        hostname: mongodb
        networks:
            - hostnet
        ports:
            - "27017:27017"
        command: --bind_ip_all
        volumes:
            - mongodb:/data

    orion:
        image: fiware/orion
        hostname: orion
        depends_on:
            - mongodb
        networks:
            - hostnet
        ports:
            - "1026:1026"
        command: -dbhost mongodb -logLevel DEBUG

    iotcarsrv:
        hostname: iotcarsrv
        image: iotagent4fiware/opcuacarsrv:latest
        networks:
            - hostnet
        ports:
            - "5001:5001"

networks:
    hostnet: